A textured bob with wispy bangs takes 2 minutes to finish once your hair is dry, while a sleek bob needs a flat iron and a smoothing serum every time.
The cut you pick depends on how much mirror time you actually have: low-maintenance shags and natural waves hold their shape without heat, precision bobs and blunt bangs ask for a blowout and a trim every 4 to 6 weeks.
Bangs add a trim every few weeks no matter which style you choose, and short pixies grow out faster still.
1. Textured Bob
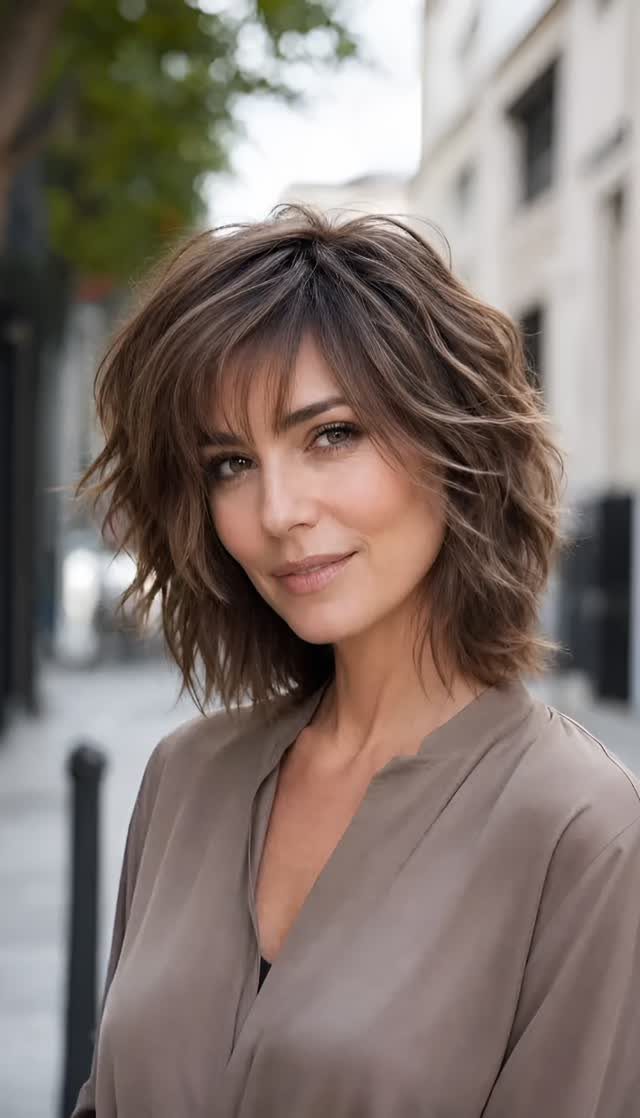
Soft waves with choppy, separated ends give a bob its movement, and the wispy bangs in this one keep the front light instead of heavy.
I like texture on a bob because it forgives a day-two cowlick or a flat crown.
Ask your stylist for a textured cut with internal layering, so the waves have room to move. Brown hair like this shows the broken-up ends well.
A texture spray worked through damp or dry hair does most of the finishing.
2. Angled Wispy Bob
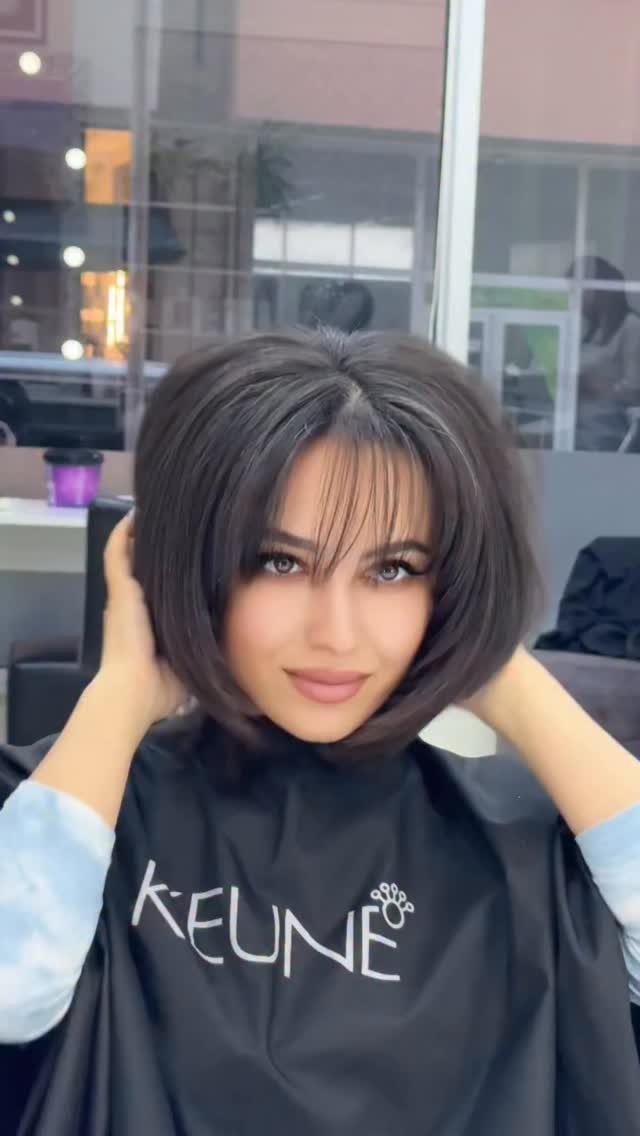
Volume sits at the crown and the cut slopes longer toward the front, which is what makes an angled bob look fuller than a straight one. Wispy bangs soften that shape so it doesn’t read too severe.
Bring a photo to the appointment and say "angled" and "wispy" by name. Both words change the cut.
On dark brown hair the angle shows clearly, since the line stays crisp against the color. A round brush and a blow dryer give you the lift at the roots.
3. Long Sleek Hair
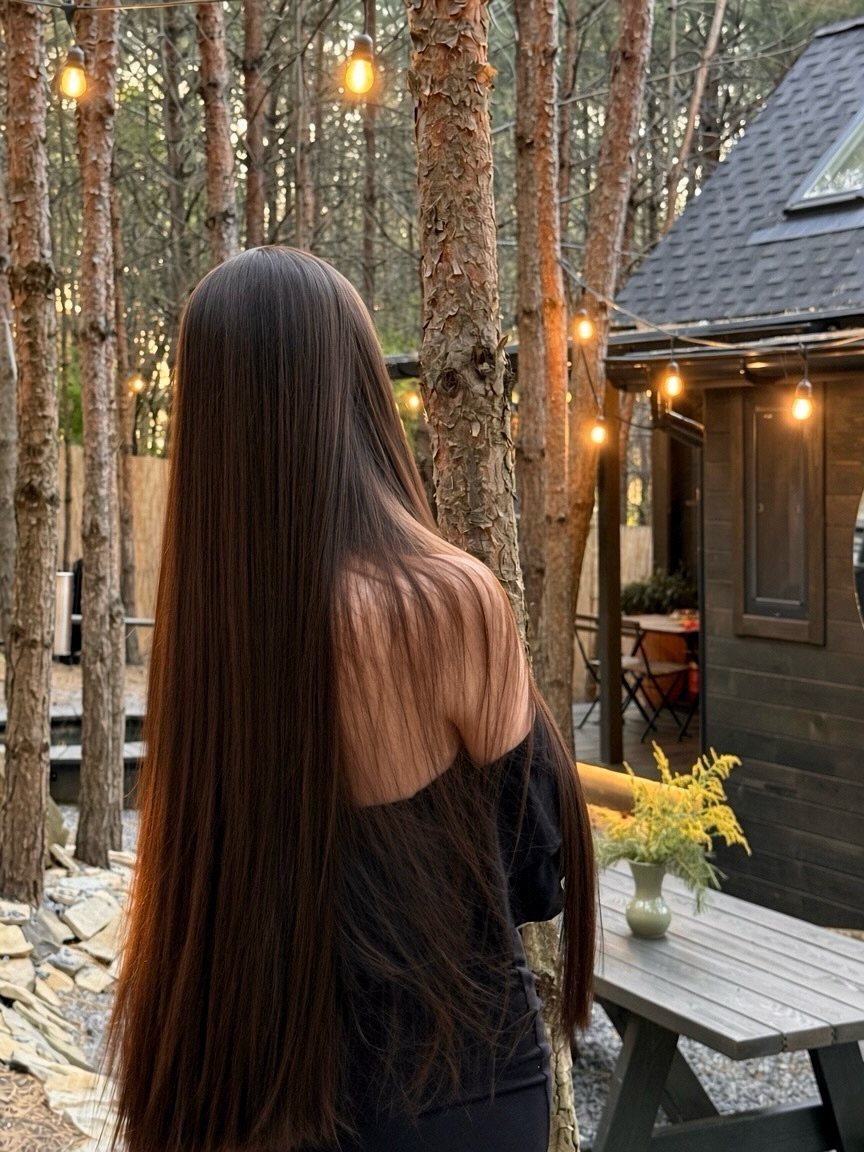
Length alone doesn’t make this look; the shine does. Hair falling in one smooth sheet down the back is the whole picture, and any frizz or flyaways break it.
Straight, dark hair like this reflects light well, so a smoothing serum on the mid-lengths and ends does a lot. A flat iron or a blow-dry with a paddle brush gets the sleek finish.
I would keep the ends trimmed, because blunt, healthy ends are what make long hair look this glossy from behind.
4. Short Undercut Design
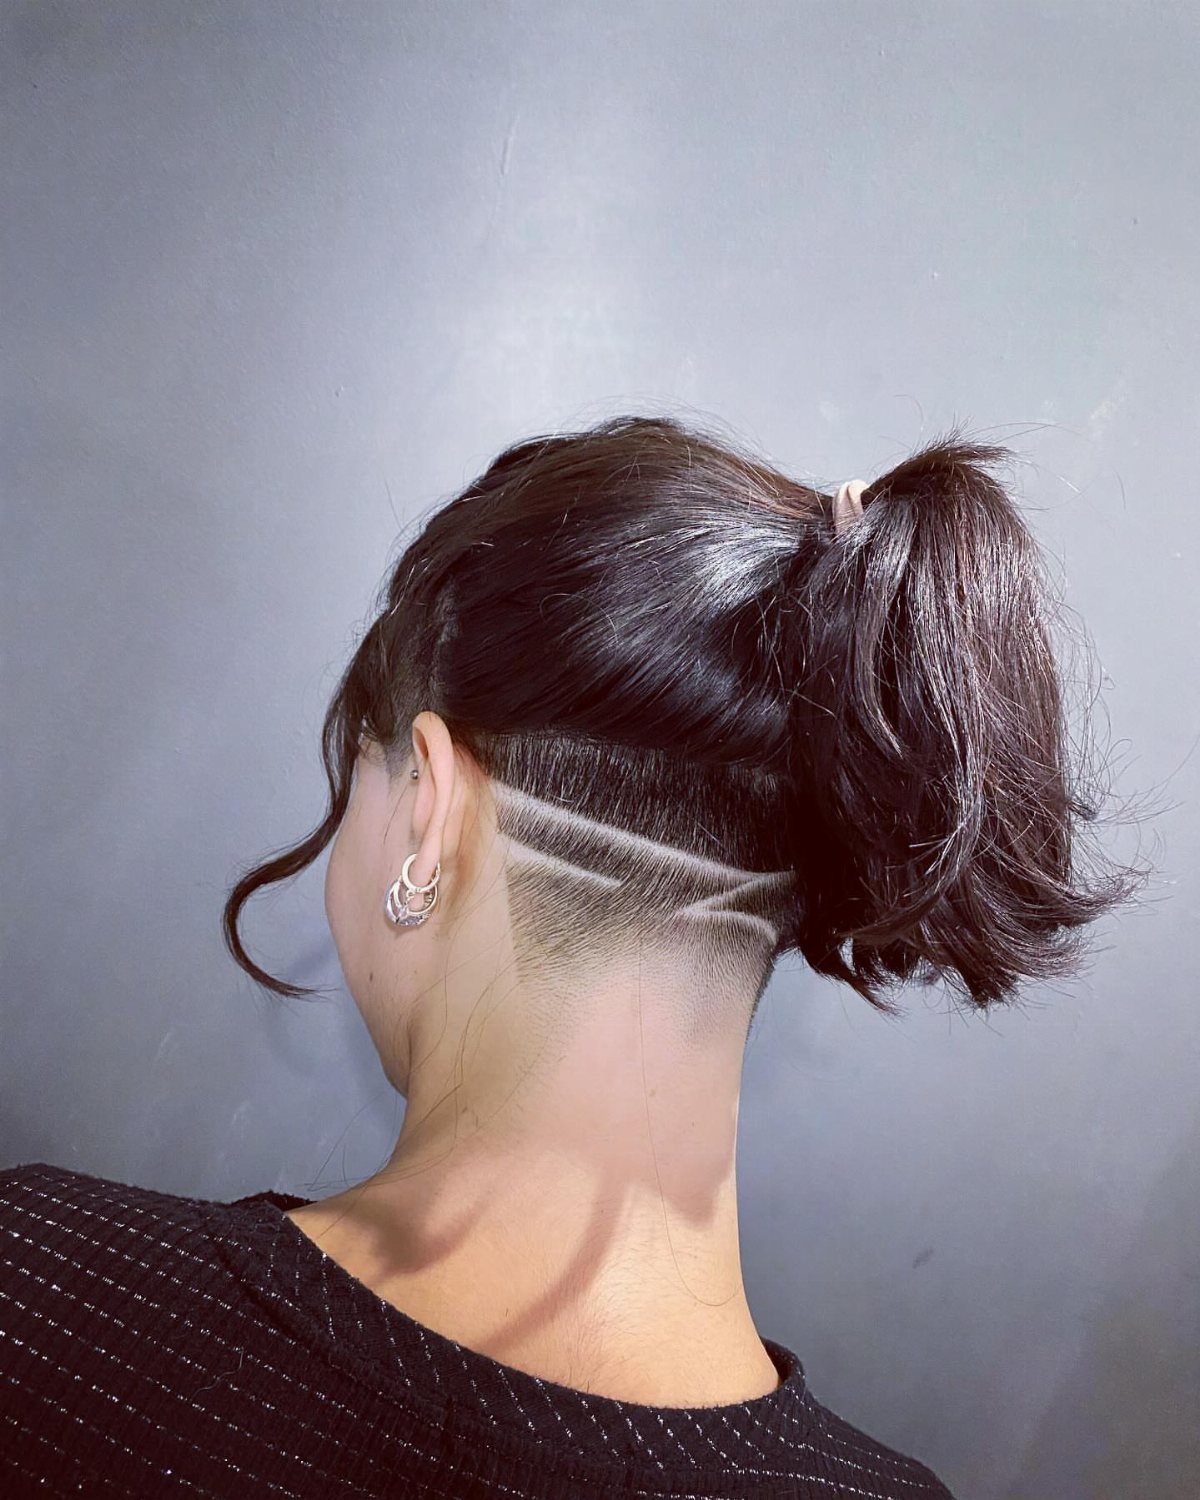
A shaved nape with a chosen design turns a hidden part of the haircut into the detail.
Because the design is cut into the shaved layer beneath the top hair, curved lines stay hidden when your hair is down and show as soon as you pull it into a ponytail or bun.
You pick the design, which makes this one personal. Bring a sketch or a reference photo to a barber or stylist who does clipper work.
A ponytail or bun shows it best. Down, the longer hair covers it, which is a real perk if you want it private.
5. Face-framing Curls
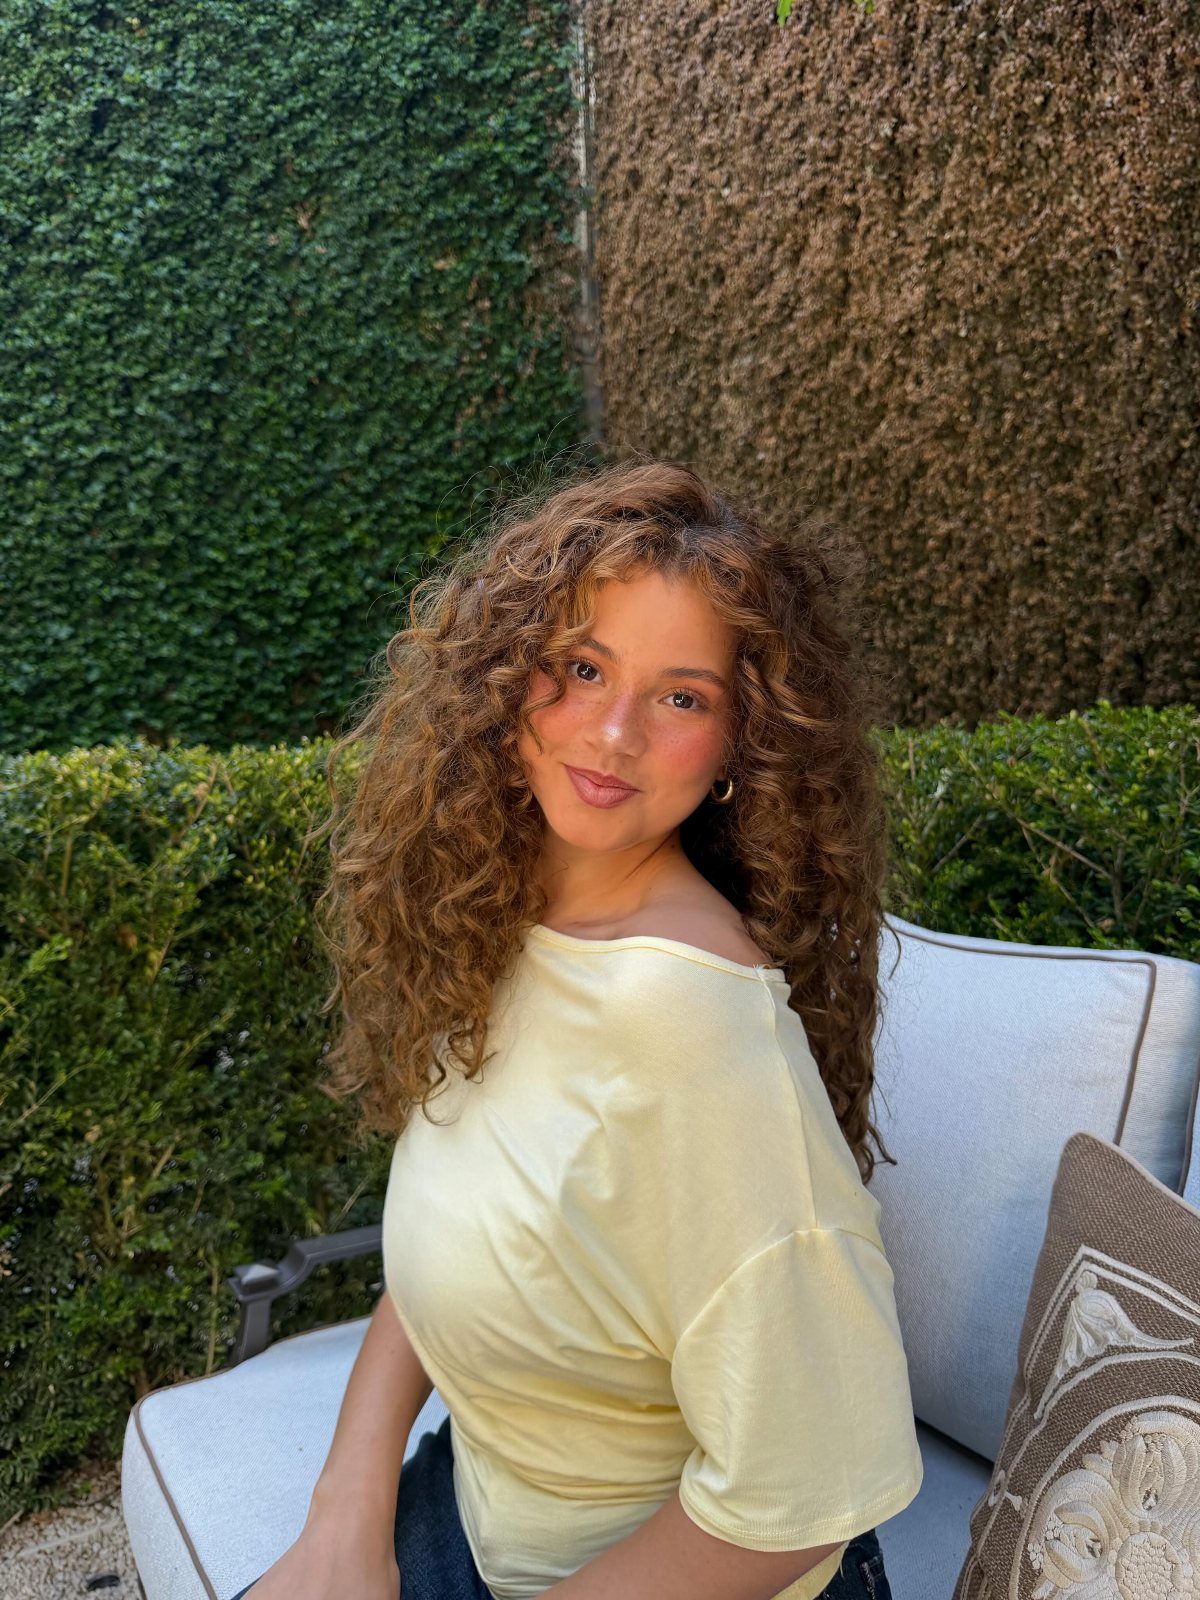
Curls that fall forward around the face put the attention on the cheekbones, and in this look the volume is full enough to act like a frame. Brown curls with some bounce at the front do it well.
I would ask a stylist to shape the curls around your face while the hair is dry, since curls spring up and sit differently once the weight is gone.
Define them with a curl cream on damp hair, then leave them alone while they dry.
6. Face-framing Layers
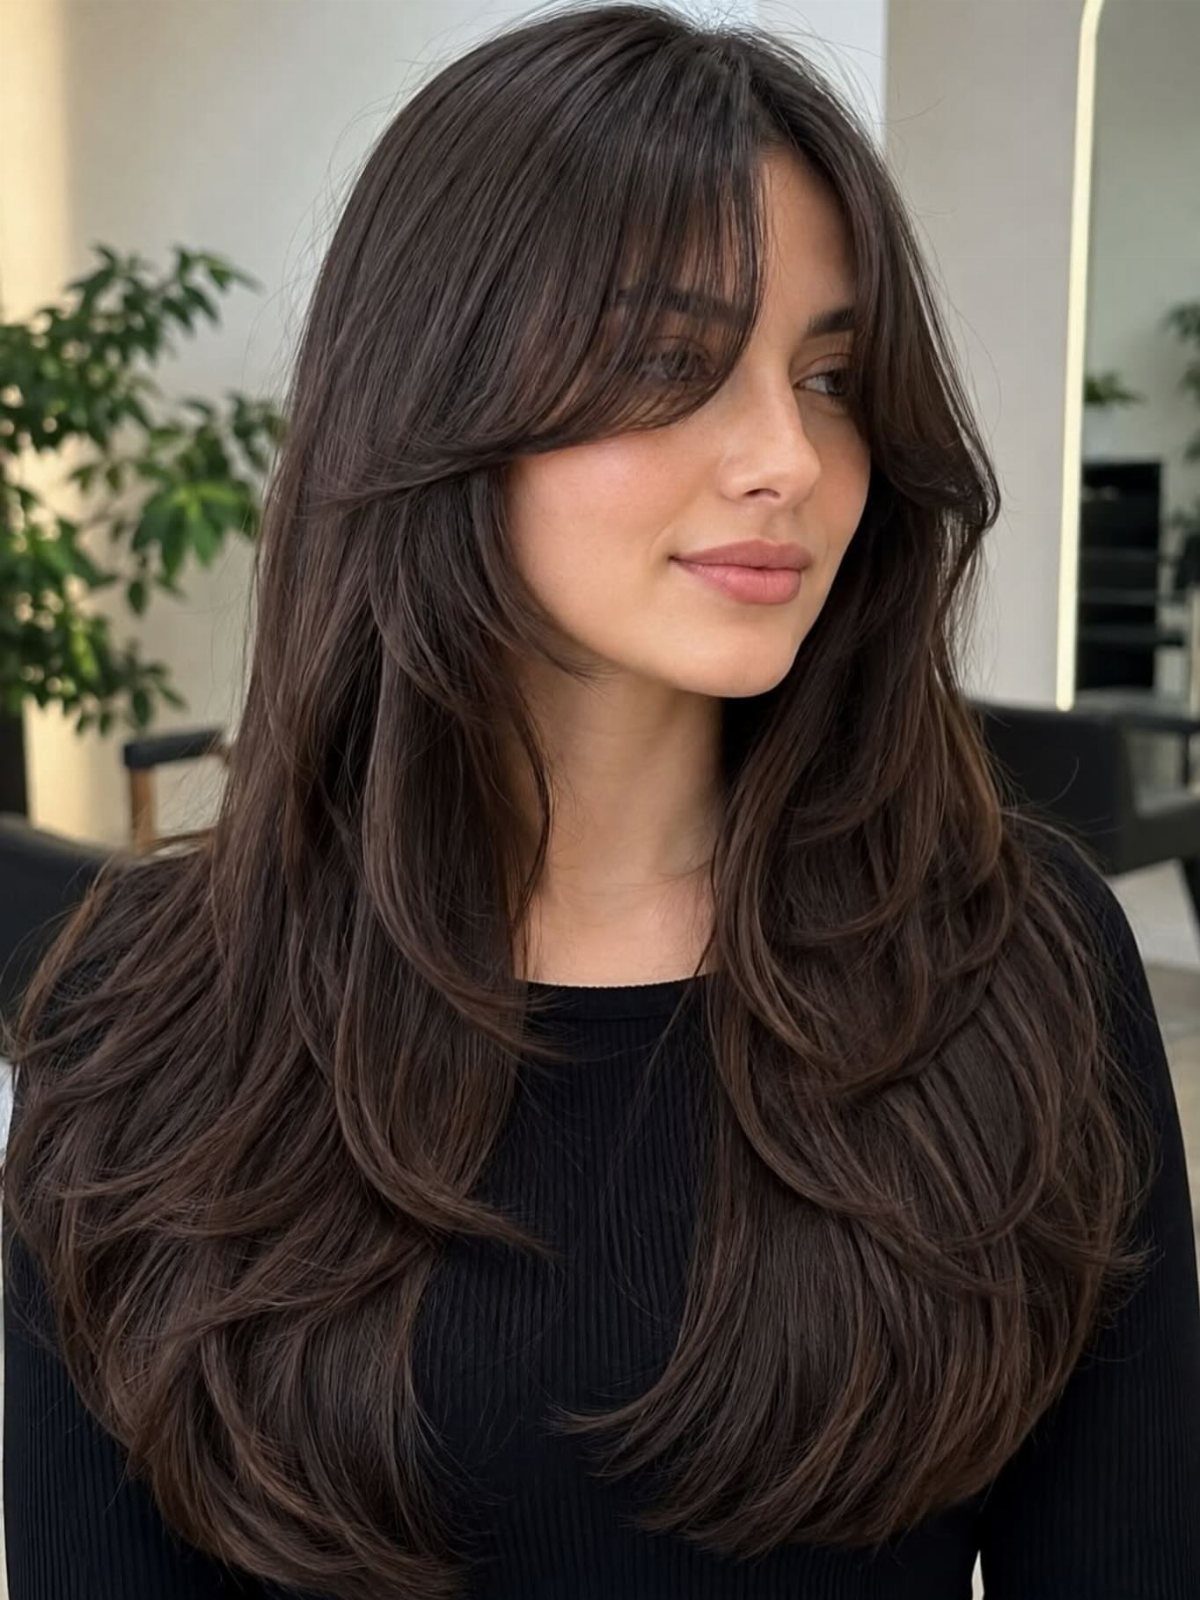
Long dark hair with blended layers and soft bangs gives a face a gentle frame without cutting much length.
Layers that start near the cheekbones can balance a face that feels too wide or too long, depending on where they fall.
Tell your stylist which feature you want to soften, then let them place the shortest layer. The blended finish here means no harsh steps.
Bangs add a trim every few weeks, so factor that in.
7. Half-up, Half-down
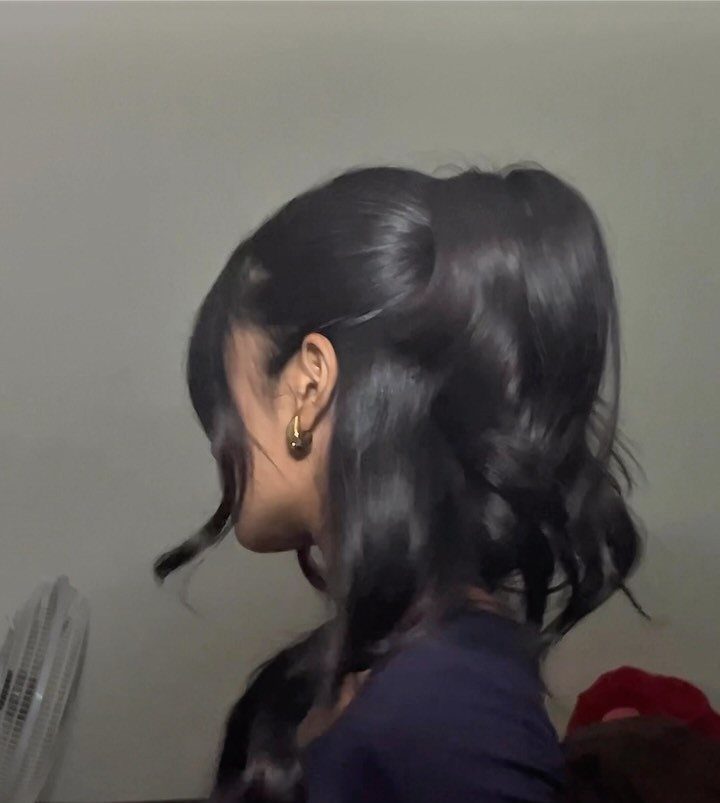
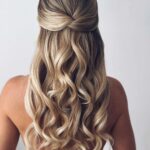
Gather the crown and temple sections, secure them at the back with a clear elastic or a clip, then leave the rest loose. The style keeps hair off your face while the length stays visible.
Waves or curls add body to the bottom section, but straight hair works too. A few face-framing pieces left out in front soften the pulled-back part.
Takes about 2 minutes once your hair is curled or dry.
8. Long Layers
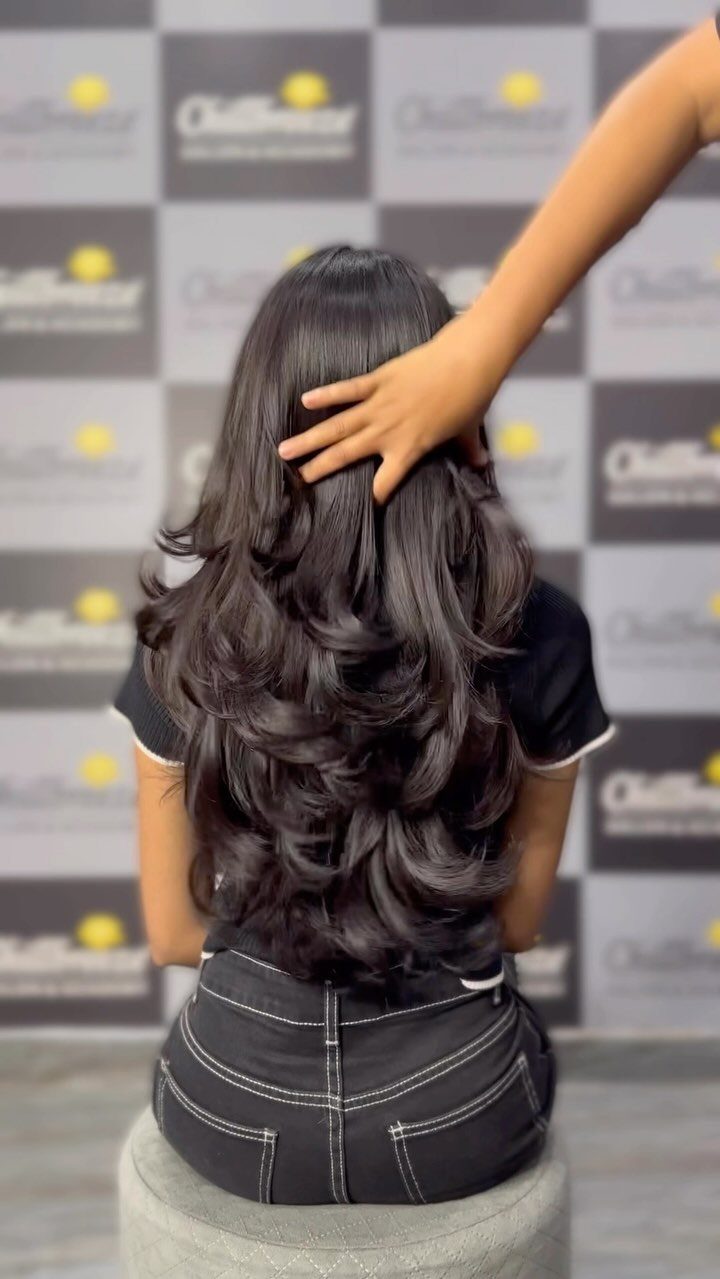
Layers cut into long hair break up the weight so it moves instead of hanging flat. The shortest pieces here start a few inches below the chin, and the length graduates down to create shape without losing much overall length.
Ask for blended layers if you want a soft finish, or more separation if you want definition between sections. Wavy or curly hair shows the layers more than straight hair does.
Blow-drying over a round brush pulls each layer up at the root and gives the top of the cut some lift.
9. Short Shag
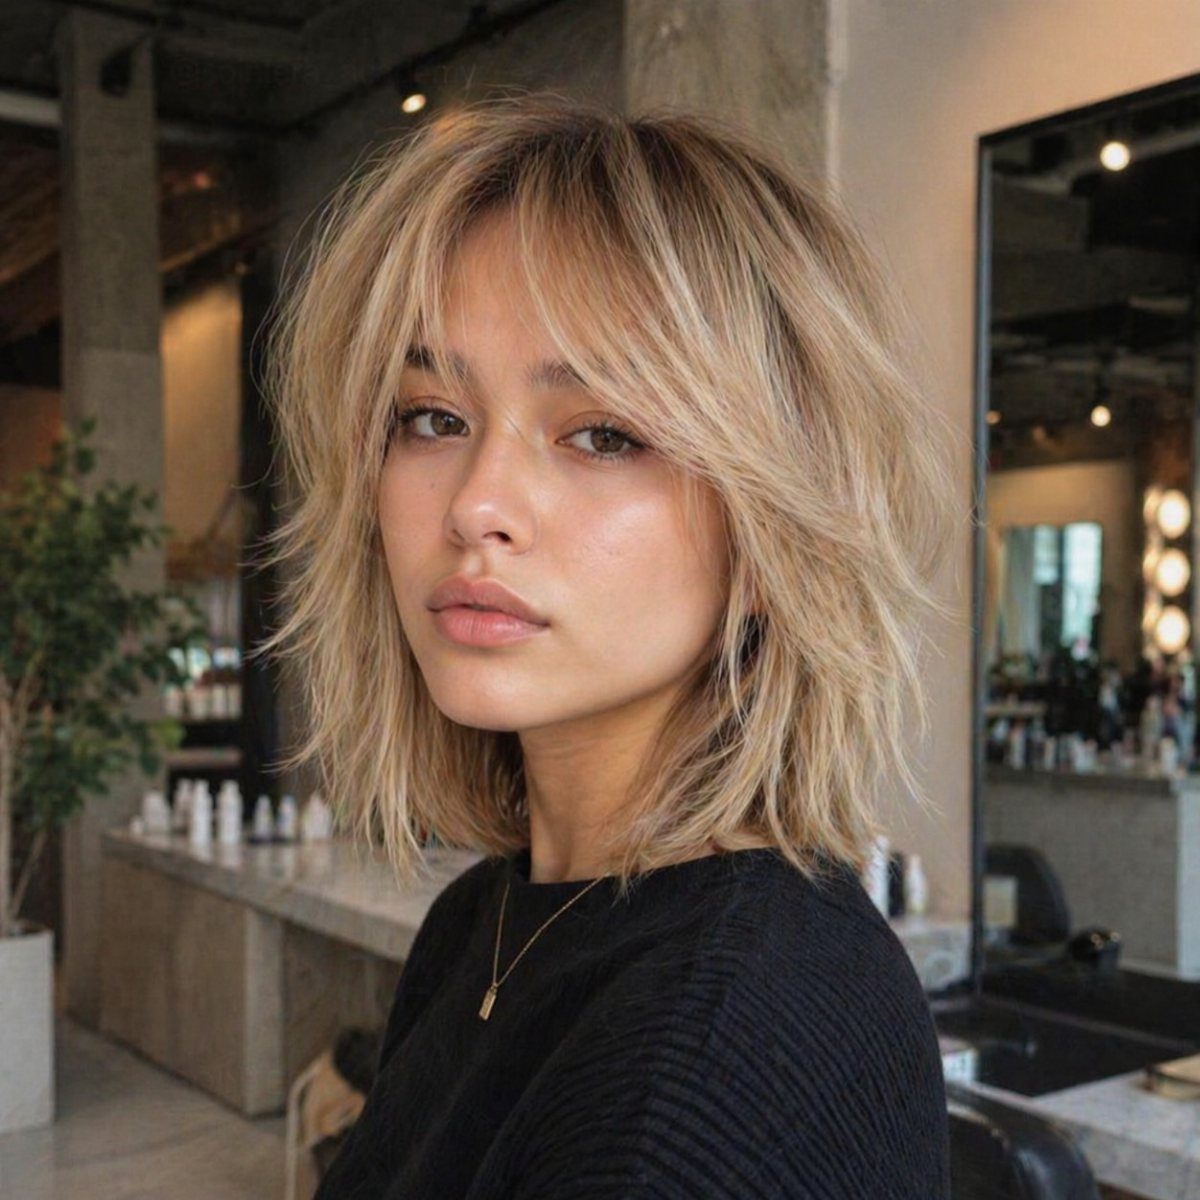
Choppy layers through short hair give it texture and lift, and the wispy bangs keep the front from looking too heavy. A shag sits between a pixie and a bob in length, usually falling somewhere around the ears or jawline.
Blonde hair like this shows the separated, piece-y ends well. Texture spray or a light pomade worked through dry hair brings out the tousled finish.
Plan on a trim every 6 weeks to keep the layers shaped.
10. Blunt Bob
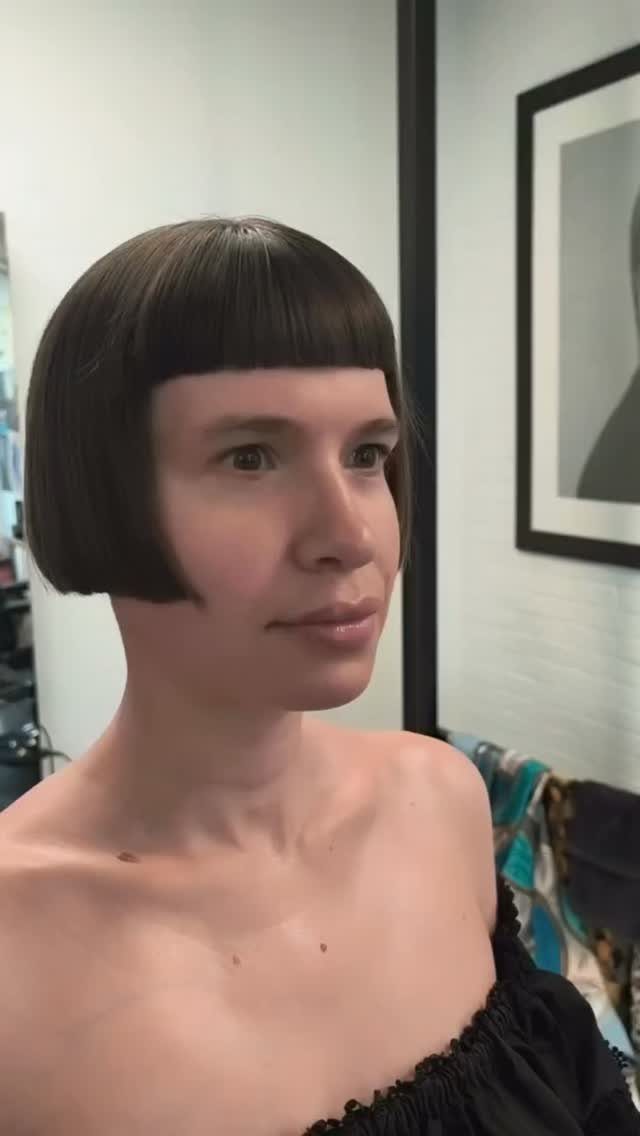
A bob cut straight across at one length gives you a clean line, and bangs cut the same way match that precision. Dark hair makes the blunt edge read sharp, since there’s high contrast against skin.
Tell your stylist you want a blunt perimeter, not textured ends. Straight hair holds this shape best, and a flat iron or a paddle brush keeps it smooth.
The grow-out is slower to look messy than a layered cut, but the line softens as length comes in.
11. Pixie Cut
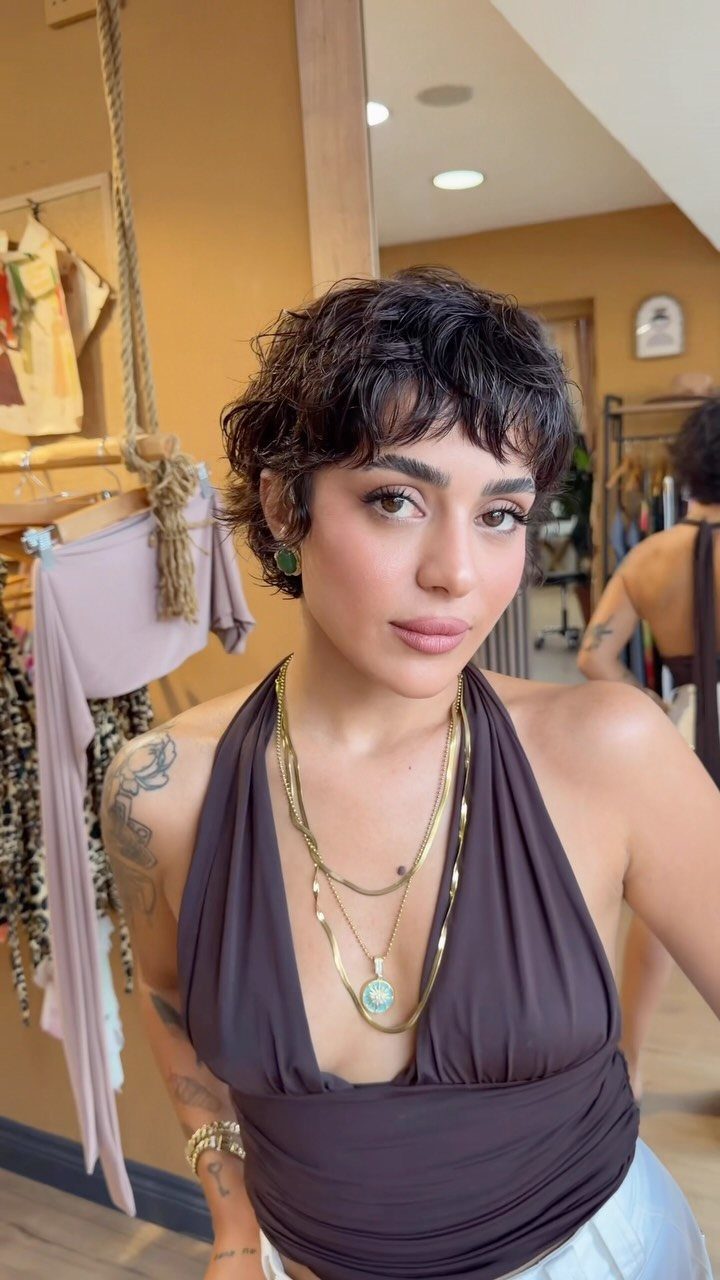
Short all over with longer pieces at the crown and wispy bangs in front, a pixie cut puts the focus on your face. Fine hair gets body from the short length, since there’s less weight pulling it down.
Styling takes a minute: run a small amount of pomade or wax through damp hair, then let it air dry or use a blow dryer for more lift at the roots.
12. Wash-and-go Curls
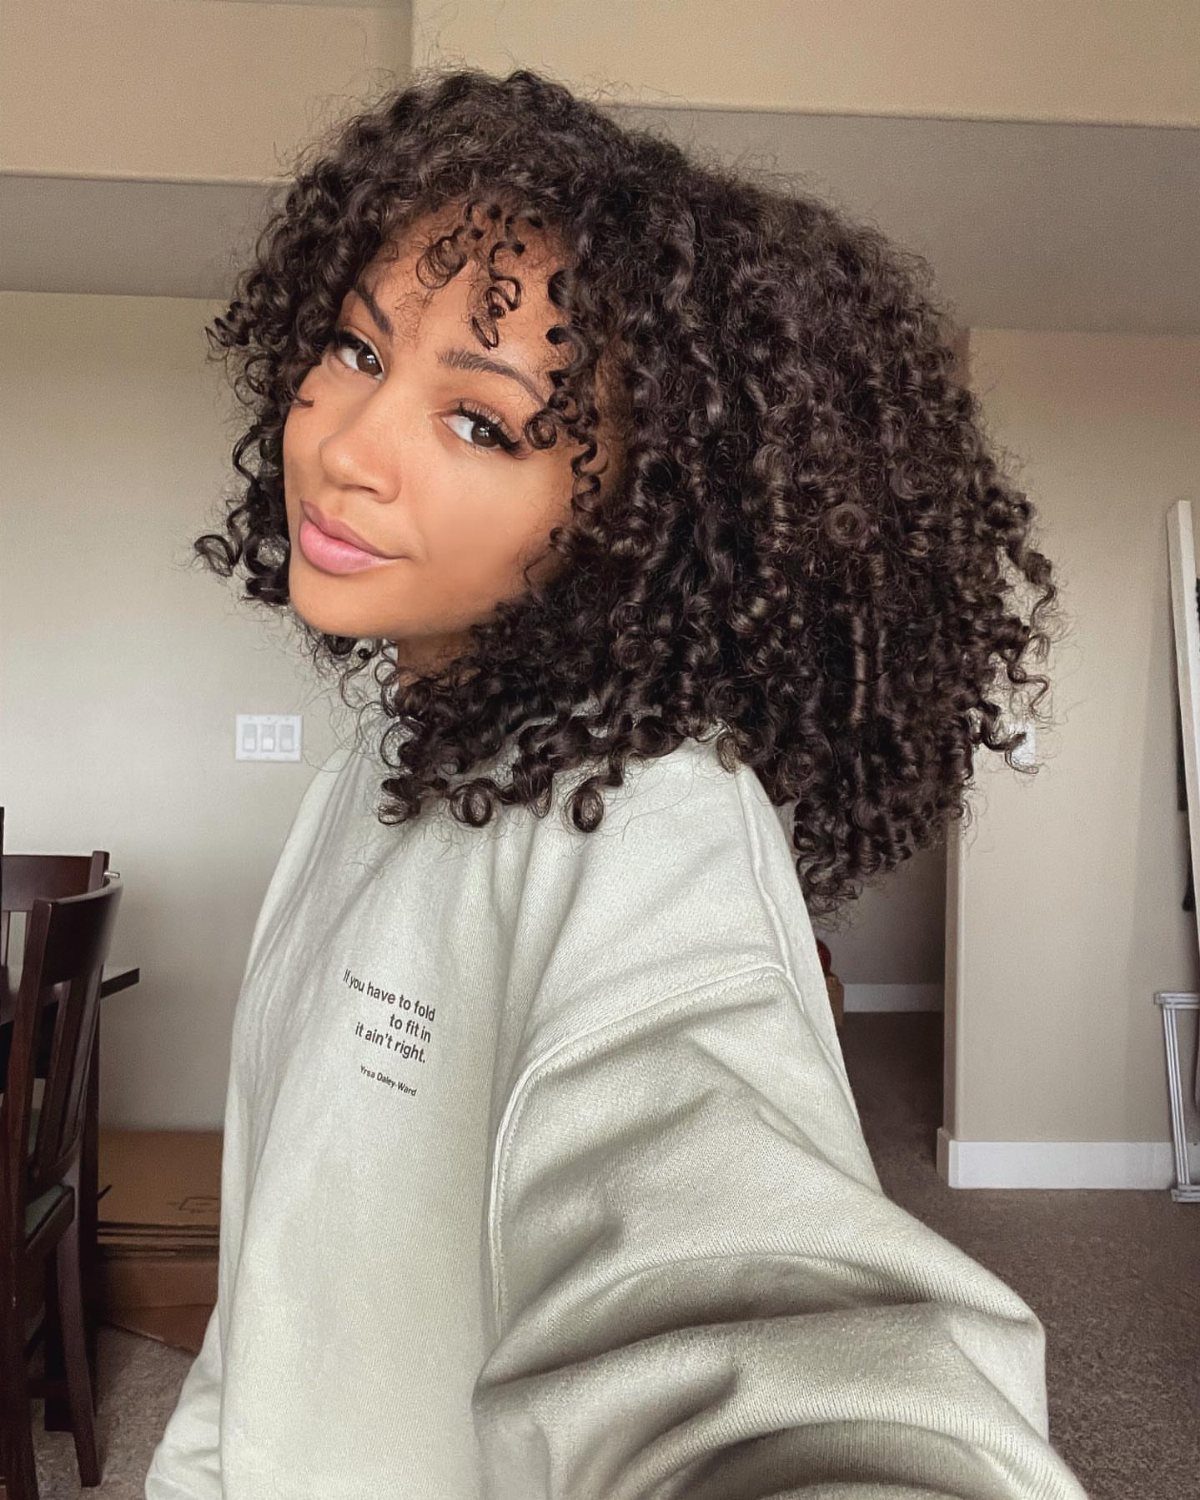
Curls that hold their shape without heat styling or a lot of product make mornings faster. Apply a curl cream to soaking wet hair, scrunch it up toward the roots, then let it air dry or diffuse on low heat.
Curly or coily hair that’s been cut to support its natural pattern works best here. Wash-and-go curls live or die on moisture, so I put a leave-in conditioner on before the curl cream.
Refresh on day 2 with a little water and more scrunching.
13. Low-maintenance Short Cut
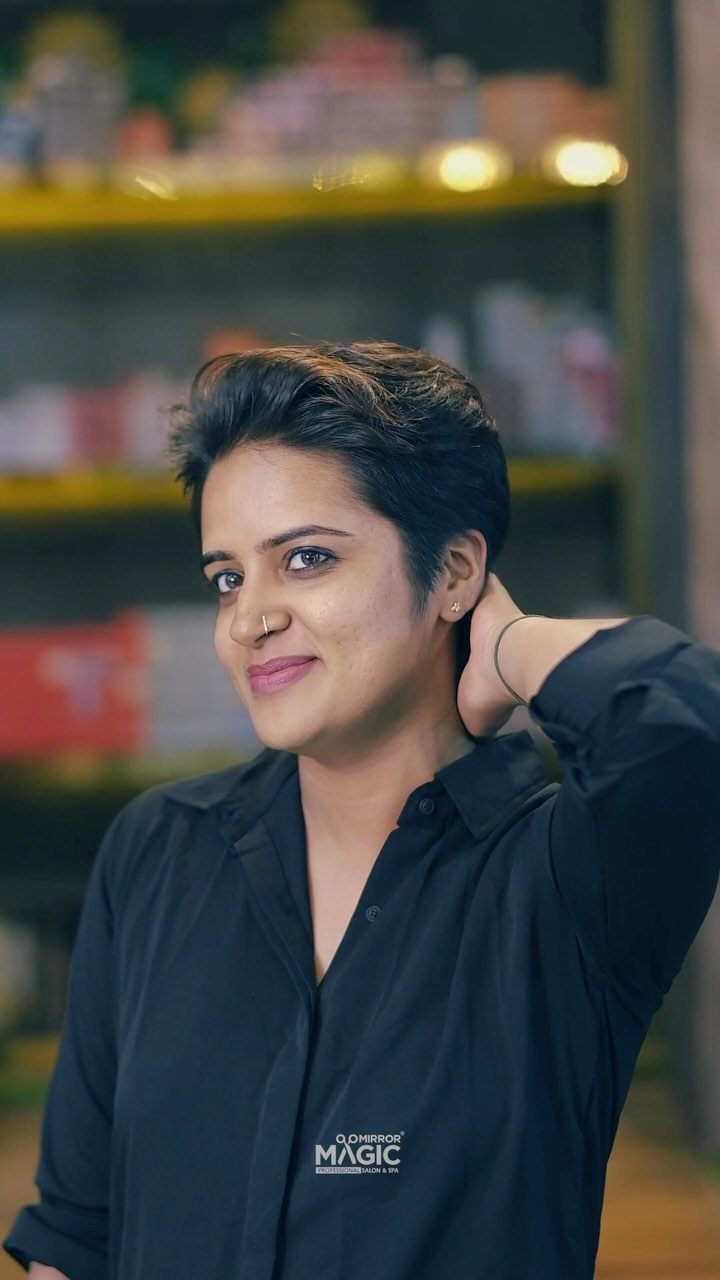
Swept straight back and cut short, this dark pixie asks very little of a morning. There’s no part to find and no length to wrangle, so styling comes down to pushing the hair in one direction.
I’d choose this if you want a cut that looks finished once it dries.
Tell your stylist you want it short and easy to sweep back, and ask how the sides and nape should be tapered so it holds its shape.
14. Claw Chignon
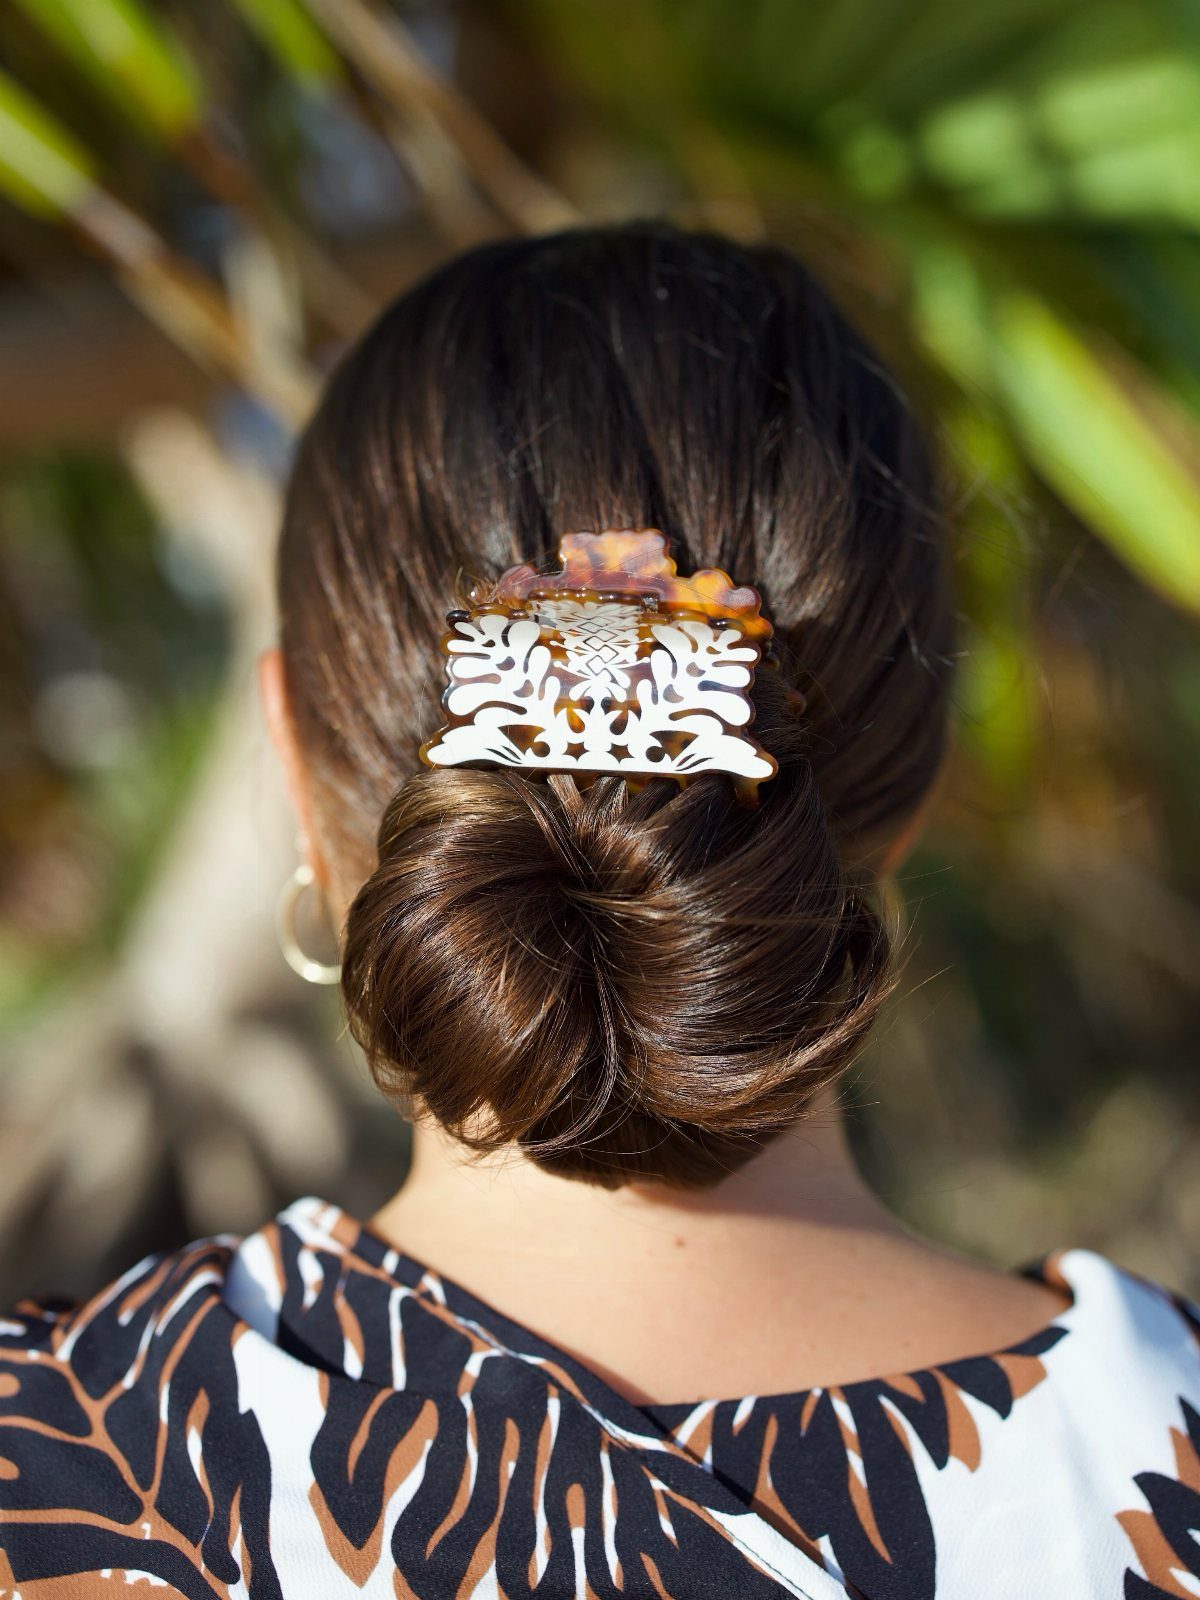
Gather your hair low at the nape, twist it into a rope, fold the twist up against your head, and set the clip over it. The claw does the pinning, so there’s no hunting for bobby pins.
An ornate clip like this one becomes part of the look, which is why I’d pick a decorative one over a plain black. From behind, the twist gives the chignon a neat, finished shape.
15. Scrunchie-less Low Bun
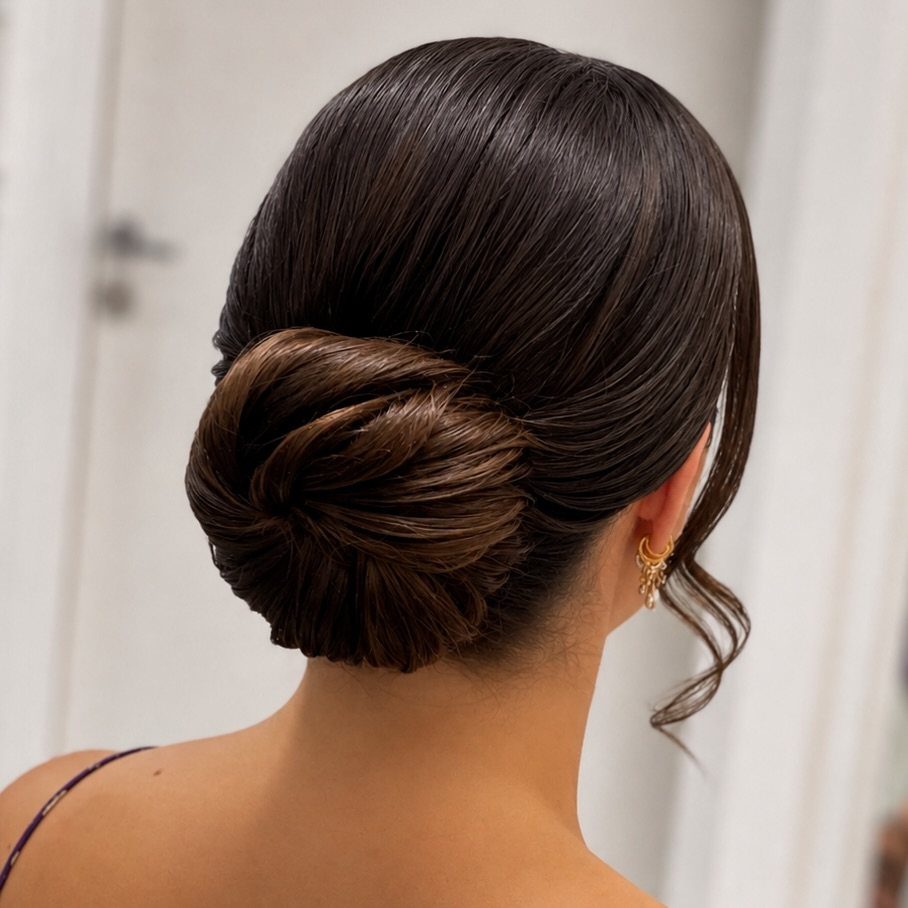
Pull all your hair back into a low ponytail at the nape, twist it, then coil the twisted section around the base.
Tuck the ends under the wrapped hair and pin the bun in place with bobby pins, about 4 or 5 depending on thickness and length.
The hold comes from the pins alone, which sit invisible inside the bun rather than outside where a scrunchie would. This setup gives you the clean line and the tendril without the bulk or the visible hardware.
If your hair is freshly washed and slippery, a light texture spray or day-old hair will help the pins grip.
16. Tall Topknot
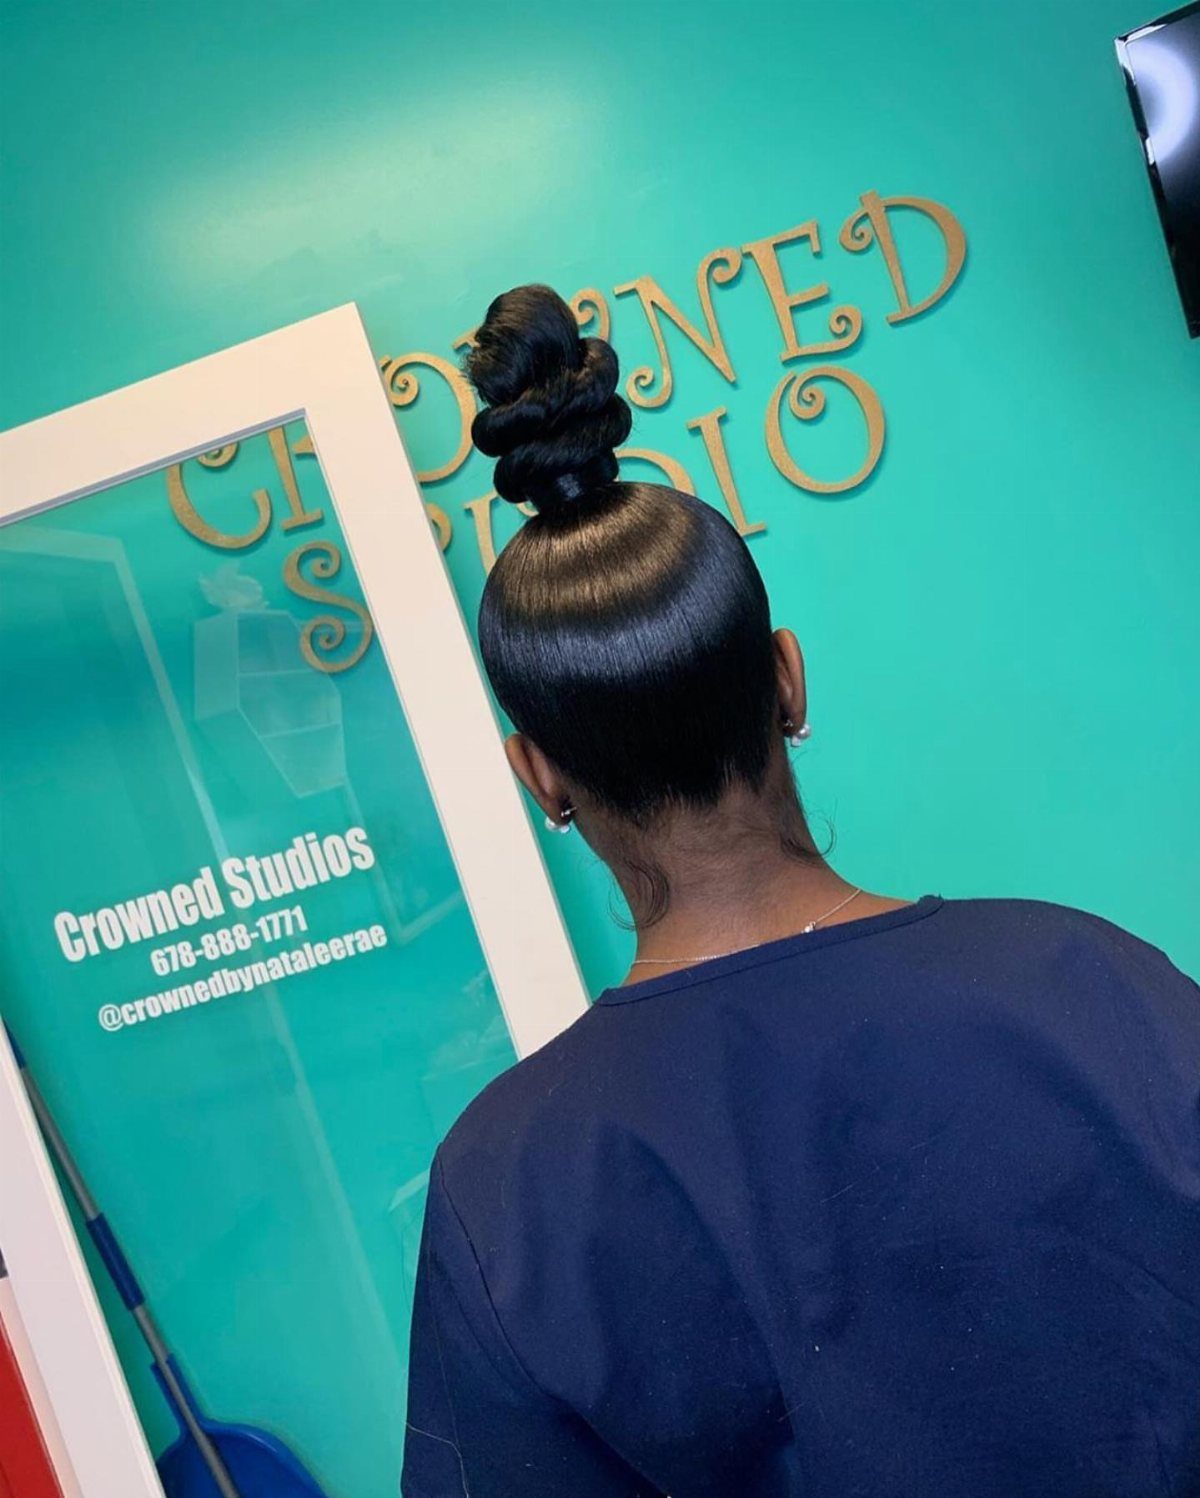
A topknot earns its name from height, so gather the hair at the crown rather than the back of the head. Twist the length into a rope, coil it around its base, and secure it with an elastic or pins.
Glossy, smooth hair makes the coil read as one clean shape, so smooth the sides before you wrap. I like the tall version because it keeps everything off the neck and shoulders.
17. Twisted Ponytail
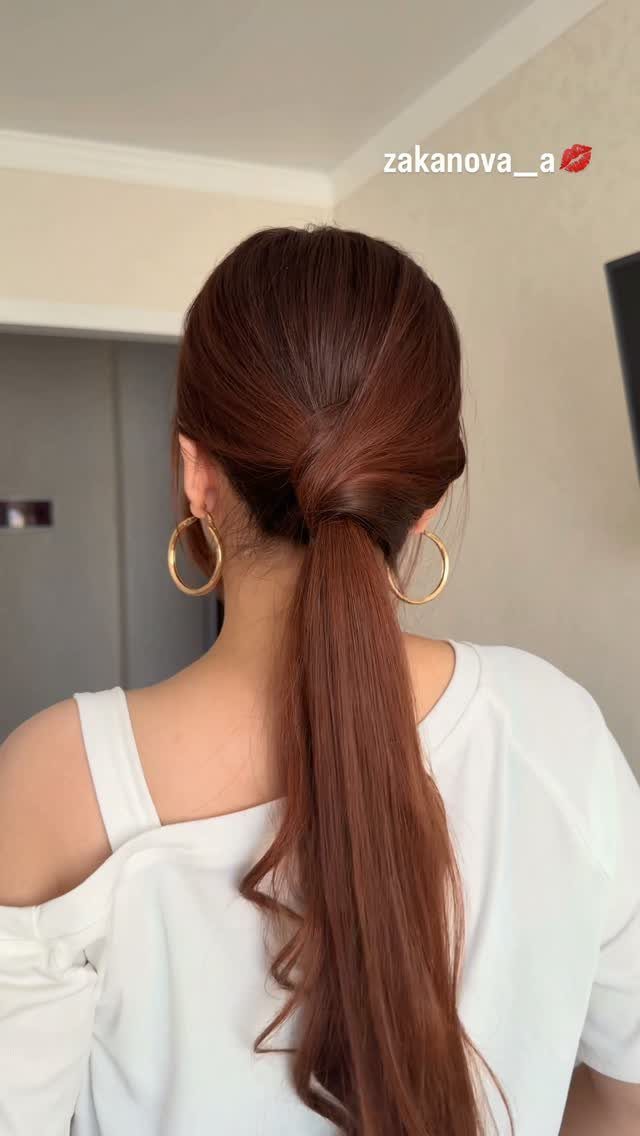
Tie a low ponytail, then split the hair just above the elastic to make an opening. Flip the tail up and through that gap, and pull gently to snug it.
On long hair like this auburn length, the flipped section turns into a neat twist down the back. Gold hoops suit it, since nothing covers the ears or neck.
18. Natural Waves
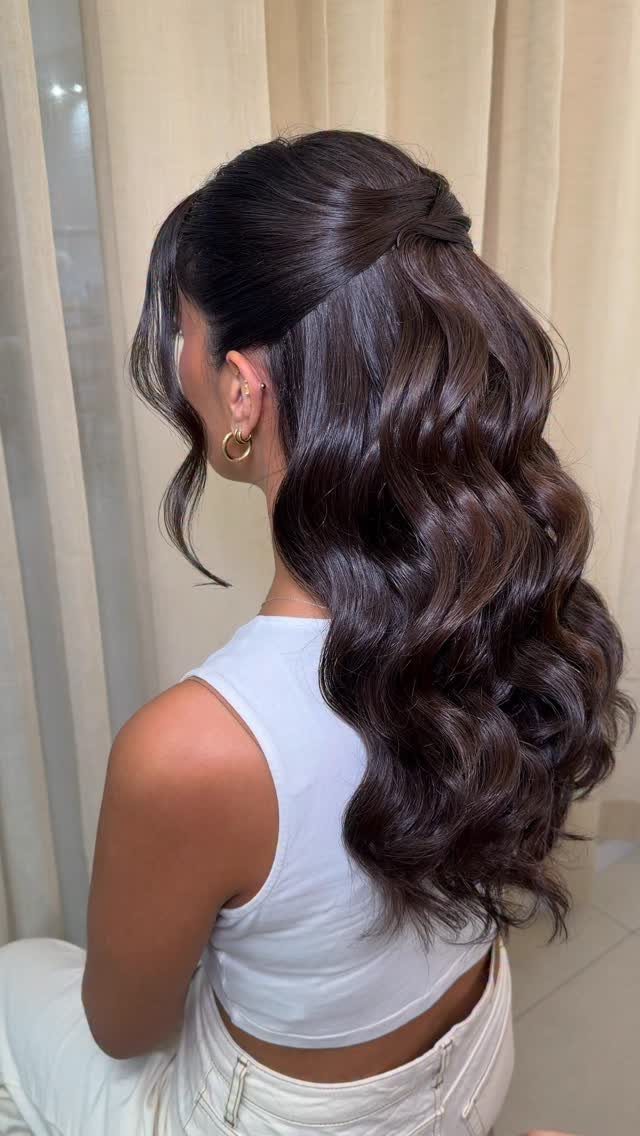
Your own wave pattern is the whole style here, which makes it an easy one to bring to a photo session. Long, loose waves with the sections nearest the face pinned back and the rest left to fall.
Dark brown hair shows the shine in every wave. I’d leave the pattern alone instead of curling it tighter, and pin only the front so the waves at the back still show.
19. Copper Graduated Cut
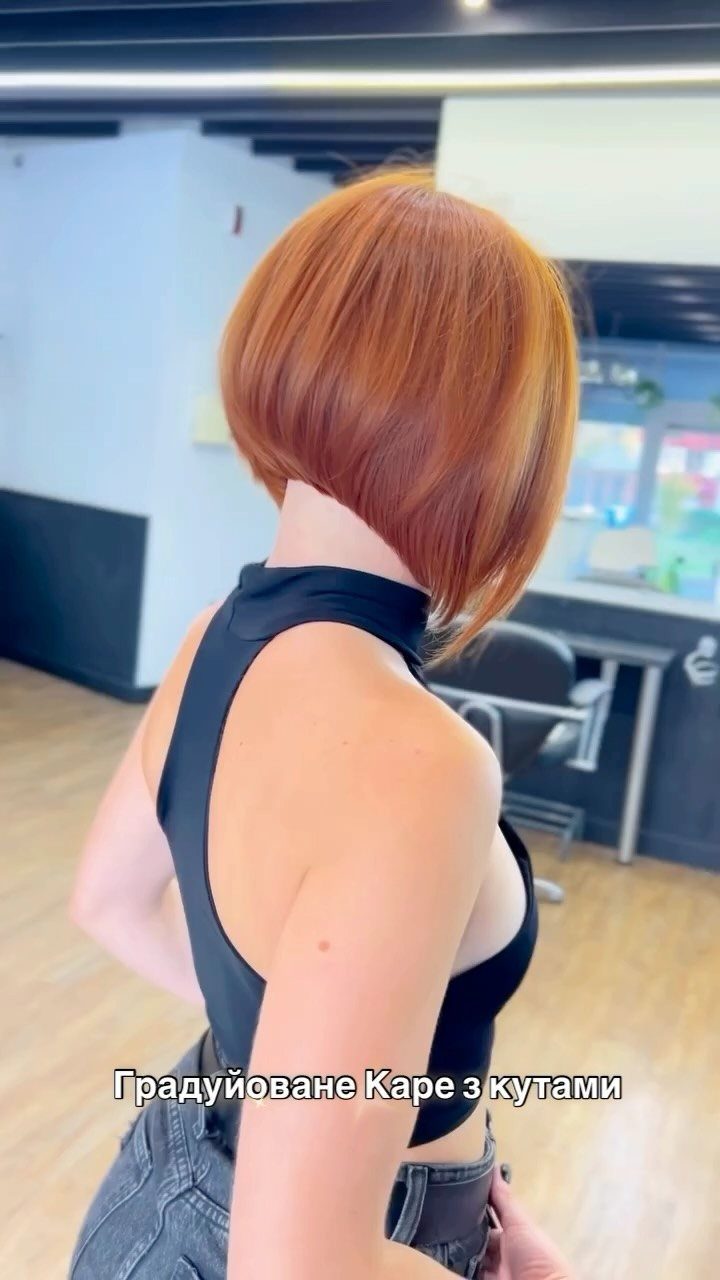
Copper color sits on top and makes that shape easy to read from behind.
Bring a photo and name both the cut and the shade. Wispy ends soften the angle so the bob doesn’t look hard, and asking your stylist to point-cut the tips gets you there.
Choosing a Stylist Reference Photo
Zoom in on the hair itself before you save a reference photo, not just the overall mood.
A model with a different texture, density or hairline can make a cut look easy that won’t behave the same way on your head.
Check 3 things:
- A low hairline or cowlick will lift or push blunt bangs out of place, no matter how smooth they look on someone else.
- Fine hair reads thinner on camera, so thick curtain bangs or heavy layers may need extensions to fill out the same way.
- A sleek bob might be a textured cut blown straight, so ask whether the line is in the haircut or the iron work.
For short cuts, bring references from different angles. Weigh your own texture, face shape, head structure and daily schedule when you decide what to ask for.
A quick blowout, a natural wave or a ponytail all hold up.
Matching Cuts to Face Shape
Place volume where your face needs it, not where the trend does.
- Round: long layers, deep side parts and a textured pixie add vertical length. I stay away from chin-length blunt bobs, which stop right where the jaw is widest.
- Oval: most cuts work. Long curtain bangs and collarbone lobs let the symmetry do the work.
- Square: soft, wispy fringe and face-framing layers ease a strong jaw. Sharp, geometric cuts repeat the angles instead of softening them.
- Chin-length bobs and side-swept bangs fill out a narrower jawline. Pull volume away from the crown.
- Long: shags, curtain bangs and chin-level layers break up the length and add width. Very long, one-length hair with no movement makes the face look longer.
Matching Style to Upkeep
Count the minutes you actually have in front of the mirror, not the minutes you wish you had. A fussy cut only works if you’ll style it every time.
Natural-texture shags and long layers need little heat.
Precision bobs and thick curtain bangs need regular blowouts, heat tools and a few products each time. Those cuts need a trim every 4 to 6 weeks to keep the line clean, and short pixies grow out even faster.
Count those appointments as part of the cut’s real cost before you commit.
Frequently Asked Questions
What hairstyle looks best in pictures?
A style you already wear well and one that suits the setting both look best, since you’ll feel like yourself and the cut won’t fight the light or the lens.
For a beach session, pin the front sections back so wind doesn’t pull hair across your face. For a city or park session, a blowout, your natural wave or a ponytail all hold up.
How do I do my hair for pictures?
Set your hair with a dry texture spray instead of wet hairspray before you step in front of the camera, since it gives you workable hold and movement under studio lighting without looking stiff.
Camera lenses flatten subtle texture, so structured volume and distinct wave separation read better than soft, undefined layers. Match the style to the session and pick something familiar that makes you feel beautiful.